Tsquared
Well-known member
- Joined
- Sep 3, 2020
- Posts
- 103
- Type aircraft owned
- CCX-2000
- Base airport
- KMIC
- Ratings
- Private. Endorsements - Tailwheel and HP
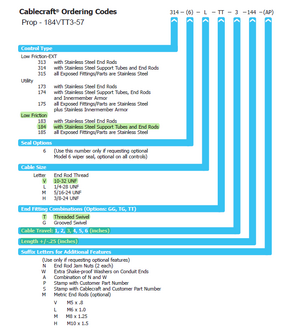
For those FX3 owners who have not had to remove the interior, left side panels for maintenance, I documented the the removal of my panels when I removed them to allow replacement of a failed propeller control cable (part number SP58011-007, $239 + shipping) I’ve been told a number of FX3’s have required replacement prop control cables early. Mine needed it at 413 hrs.
Removing the left side panels is pretty easy, but can be a bit frustrating. It took me a leisurely 2.5 hrs to complete. I used the CK-KM308 EX3 Finish Manual Rev B as a start point. The manual documents the process EX3 builders use to assemble the interior of the plane.
Before starting I strongly recommend getting some plastic auto trim removal tools that are no scratch. Don’t use anything metal…. Don’t ask me how I know. Also get some extra plastic rivets and either a lot of small bags or some sort of organizer so you can keep the screws and parts organized.
Before starting I pulled the ignition and starter CB’s and moved my fuel selector to off just be to on the safe side.
1 - remove the throttle and prop control knobs from both the pilot and passenger levers. Also remove the metal guides as well. Your going to need to remove the knobs first, then turn the metal guard 90 degrees to remove it.

2 - remove the plastic rivets from the forward panel.

Note the top of the panel has a cut out for some wires. You will have to work the panel around the cables to get the panel out.

3 - pull the front panel back to slide it out.

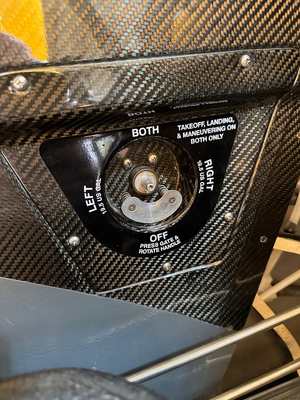
4 - The fuel selector switch needs to be taken apart before the middle panel can be removed. Having the diagram from the finish manual handy helps with the disassembly and assembly of this component. Unscrew and remove the selector switch. Note this took more effort then I expected it to. Its press fit as well as screwed in

5 - Remove the press gate. WARNING - there are springs behind each of the screws. Go slow and don’t lose these.


6 - remove the screws holding the carbon fuel select panel. Note there are small plastic washers behind each screw.

7 - remove the “washer/cover” that covers the hole the throttle lock knob stick thru. Note the cover has adhesive on it, so store it appropriately so it can be reused. I’m told that little “washer/cover” costs $40

8 - remove the pully covers attached to the floor. They are not attached to the panel, but removing them will help removing the panel.

9 - remove the hose from the heating

10 - use a car panel remover to loosen the velcro holding the middle interior panel from the exterior panel and slip the control levers outside the panel.


11 - remove the remaining plastic rivets from the middle panel.
12 - Once the panel is free, this is where the fun begins. I found it easiest to shift the panel forward to allow the rear of the panel around the rudder cables guide and doing this while lifting the middle of the panel up to move the panel around the aileron cable on the floor. work the front of the panel loose first then


13 - once clear of the rear panel, its fairly easy to pull the rear of the panel up and back (freeing the hot air Chanel from the frame under the panel) and remove the whole thing.
Reinstalling the panels is just the reverse. I was able to reuse some of the plastic rivets I originally removed, but needed a handful of new rivets.
Hope this helps. Doing it myself likely saved 5 hrs of AP labor ($500+).
Removing the left side panels is pretty easy, but can be a bit frustrating. It took me a leisurely 2.5 hrs to complete. I used the CK-KM308 EX3 Finish Manual Rev B as a start point. The manual documents the process EX3 builders use to assemble the interior of the plane.
Before starting I strongly recommend getting some plastic auto trim removal tools that are no scratch. Don’t use anything metal…. Don’t ask me how I know. Also get some extra plastic rivets and either a lot of small bags or some sort of organizer so you can keep the screws and parts organized.
Before starting I pulled the ignition and starter CB’s and moved my fuel selector to off just be to on the safe side.
1 - remove the throttle and prop control knobs from both the pilot and passenger levers. Also remove the metal guides as well. Your going to need to remove the knobs first, then turn the metal guard 90 degrees to remove it.
2 - remove the plastic rivets from the forward panel.
Note the top of the panel has a cut out for some wires. You will have to work the panel around the cables to get the panel out.
3 - pull the front panel back to slide it out.
4 - The fuel selector switch needs to be taken apart before the middle panel can be removed. Having the diagram from the finish manual handy helps with the disassembly and assembly of this component. Unscrew and remove the selector switch. Note this took more effort then I expected it to. Its press fit as well as screwed in
5 - Remove the press gate. WARNING - there are springs behind each of the screws. Go slow and don’t lose these.
6 - remove the screws holding the carbon fuel select panel. Note there are small plastic washers behind each screw.
7 - remove the “washer/cover” that covers the hole the throttle lock knob stick thru. Note the cover has adhesive on it, so store it appropriately so it can be reused. I’m told that little “washer/cover” costs $40
8 - remove the pully covers attached to the floor. They are not attached to the panel, but removing them will help removing the panel.
9 - remove the hose from the heating
10 - use a car panel remover to loosen the velcro holding the middle interior panel from the exterior panel and slip the control levers outside the panel.
11 - remove the remaining plastic rivets from the middle panel.
12 - Once the panel is free, this is where the fun begins. I found it easiest to shift the panel forward to allow the rear of the panel around the rudder cables guide and doing this while lifting the middle of the panel up to move the panel around the aileron cable on the floor. work the front of the panel loose first then
13 - once clear of the rear panel, its fairly easy to pull the rear of the panel up and back (freeing the hot air Chanel from the frame under the panel) and remove the whole thing.
Reinstalling the panels is just the reverse. I was able to reuse some of the plastic rivets I originally removed, but needed a handful of new rivets.
Hope this helps. Doing it myself likely saved 5 hrs of AP labor ($500+).